Sunday 25 October 2020

LaTeX crash course

A crash course to get you started with LaTeX, LaTeX, which is pronounced «Lah-tech» or «Lay-tech», is a document preparation system for high-quality typesetting. It is most often used for medium-to-large technical or scientific documents but it can be used for almost any form of publishing.

LaTeX is not a word processor! Instead, LaTeX encourages authors not to worry too much about the appearance of their documents but to concentrate on getting the right content [1].


overleaf tutorial

latex tutorial
tex studio


Tuesday 7 July 2020

Grasha's Teaching Style Survey

To understand your teaching style and improve weaker skills please take this online scoring survey. 
Teaching style affects how Teachers present information, interact with students, supervise course work, projects and other academic work. Anthony Grasha (1996) has identified five teaching styles as follows:

  • Expert (transmitter of information)
  • Formal authority (sets standards)
  • Personal model (teaches by direct example)
  • Facilitator (guides by asking questions, exploring options)
  • Delegator (develop students ability to function autonomously) 


Copyright 1976, 1987, 1990, 1996 by Anthony F. Grasha and Sheryl Riechmann-Hruska, University of Cincinnati, Cincinnati, Oh 45221


Tuesday 23 June 2020

Add virtual environment to Jupyter notebook

Add/Remove Virtual Environment to Jupyter Notebook
========================================

1.Activate the virtual environment.


2. Install the Jupyter Core

sudo apt install jupyter-core


3.Install ipykernel which provides the IPython kernel for Jupyter


pip install --user ipykernel

4.Add your virtual environment to Jupyter by typing:

python -m ipykernel install --user --name=ENVNAME


This should print the following:

Installed kernelspec myenv in /home/user/.local/share/jupyter/kernels/ENVNAME


The virtual environment is now added in the Jupyter Notebook


5.Launch a Jupyter Notebook and change the Kernel using the option Kernel>Change Kernel


6.To list the paths of all the listed kernels use the command
jupyter kernelspec list

7. It is also better to install jupyter notebook to the environment itself (i had to face the situation package not found when running the notebook as in step 4 and then changing the kernel). To do this activate the environment and then type in 

conda install jupyter notebook

8.To uninstall any unwanted kernel, list the paths of all the installed kernels and then uninstall using the command

jupyter kernelspec uninstall unwanted-kernel

Add Virtual Environment to Jupyter Notebook

Saturday 20 June 2020

fake news and image search tools

Two online tools that can used to make reverse image searches are TinEye and Google image search. These can be used locate the sources of fake news images.

Most often the fake news creators use old images available on net and then put sensational captions/comments relevant to current situation(s). These 'fake images' are then posted on social media platforms (facebook, twitter etc) which are then widely shared. The account from which the 'fake image and content' is first posted is usually deleted in a few hours.

But, by then the damage would have been done in real world.

Interestingly, these tools can also be used to perform copyright violation of images.

https://tineye.com
https://images.google.com

fake news image
fake news


Friday 29 May 2020

OBS Studio crash course

The Open Broadcaster Software is a free and open-source cross-platform streaming and recording program. OBS Studio is available for free on Windows / Linux / Mac platforms. Download and install OBS Studio using this link.
https://obsproject.com

 A crash course to use OBS Studio:
You can record a video of ppt in just 5 minutes to share with your students.

There are lots of videos available on YouTube to use the advanced features of OBS Studio

Download the help file

Required Hardware:

  • Laptop / PC
  • Phone headset
  • Internet connectivity
  • Patience and time


Watch the video (8 minutes) from this link to record the first video using OBS Studio


Now share the video recorded using any of the following platforms

  • Google Classroom
  • WhatsApp
  • Youtube Channel

Or upload the video on your You Tube channel and share the link on the platforms above. Share video recordings of short video clips (6- 8 minutes) in small portions of the topic to keep the audience engaged.

record ppt with obs and phone headset

Thursday 16 April 2020

How to use Jitsi Meet, an open source alternative

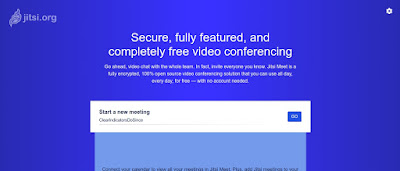
The steps to use Jitsi Meet, an open source video conferencing tool are listed below. Jitsi meet does not require any software to be installed (if running on PC) . One good feature is that the meeting link created remains after the present session has ended and can be reused, no need to create a new link unlike other tools. So the steps to setup a Jitsi Meet
  1. Go to https://jitsi.org/jitsi-meet/
  2. Scroll down the page and click "Start a call"
  3. On the next screen you will see a randomly generated meeting name scrolling below the field "Start a new meeting"
  4. Click in the space below and enter a suitable meeting name for example, meeting_may27 
  5. Click Go, and your meeting gets started
  6. After your meeting has started click the "i" icon in the bottom-right corner of the screen.
  7. Select "add password," and then enter your a password in the blank field and press enter.
  8. You meeting is now password protected
  9. Again click the "i" icon in the bottom-right corner of the screen. Click the copy icon at the end of the field Link to copy the link
  10. Share the link copied in step 9 via email/whatspp/sms along with the meeting password (entered in step 7) and share with the expected participants. 
  11. The participants can either paste the link in the browser running on PC/laptop or join meet by logging in via the jitsi meet app from Google play store or App store
  12. If the meeting is scheduled at a particular time, the admin (ie, person setting the password) has to enter the meet a few minutes before the meeting and perform step 7 once again. Please fill in the same password as shared with participants.
jitsi-a-zoom-alternative

zoom-alternative


Friday 14 February 2020

Setting up a Python development environment in Atom

Atom is an open-source cross platform for text and source code editor. It works on Microsoft Windows, Linux and macOS platforms. To configure Atom for Python programming follow these steps.

    1. Download and install Atom from https://atom.io
    2. On the Linux system activate the Python environment from the terminal ($ conda activate ENV NAME)
    3. Launch Atom from the environment by typing atom in the terminal.
    4. Now we shall install some packages to atom to make Python programming easier
          • In Atom, go to edit > preferences > install and search for the package you wish to install. Some useful packages for a python ide in atom are
          It would be better to install the autocomplete-python package without kite (use the option jedi). Else after installation of the  package, go to its settings and uncheck the option ' use kite powered completions'. It seems kite is snopping on your code.

          Cool! Now your Atom editor is ready for python programming. Happy Programming!
          To launch the terminal in Atom use Alt+ Shift +T